Category Archives: Fun projects for the home

Fun Fall Décor with Pumpkins

Standard
Fun Fall Décor with Pumpkins

Hello Everyone!


halloween 1Thought it would be fun to do a couple of Halloween projects with Halloween right around the corner this would be fun.

This idea caught my attention but I want to take it to a different level.

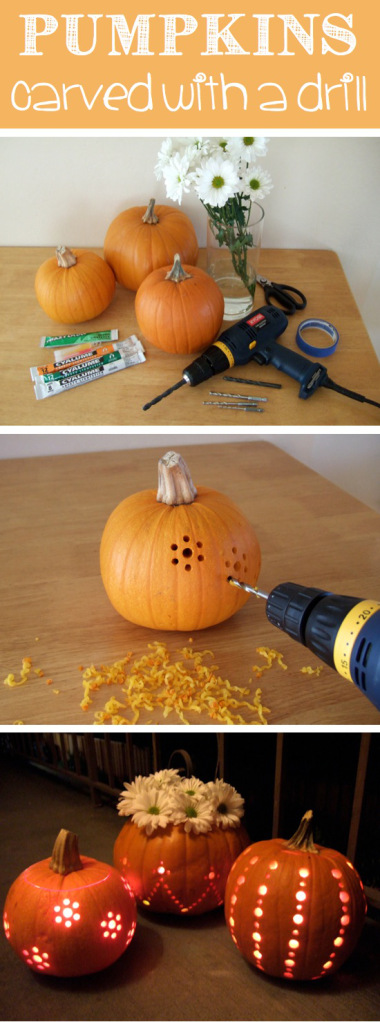
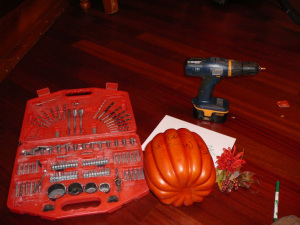
You will need: CRAFT PUMPKIN, Drill or dremel, Drill bits, Light kit, Flowers, stencils optional.

Tip: Make sure your pumpkin is a craft pumpkin and not a foam filled pumpkin.

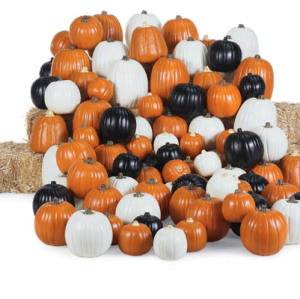
I decided that I didn’t want to deal with real pumpkin; I wanted something I could keep and eventually grow a collection over the years. Craft pumpkins at Michaels Craft stores are the perfect thing for such an idea.  Craft pumpkins come in 3 different collars and different shapes for great mixing and matching!

These designs can be used for Halloween and also for Thanksgiving. It makes decorating for fall a little simpler and very Affordable!


First, lay out your design. I put mine down on paper then transferred it onto my pumpkin with a washable marker; excellent for a nice clean look when you are done drilling. If you are not the best at transferring the design you could use a stencil. They are a great optional tool!   

halloween 2                                                        

Once you have your design laid out match up your drill sizes that would best fit your design.

Note that the size of your drill makes the design look more intricate and gives it dimension. As you can see in this picture I also purchased a floral for $1.47 to adorn the top of the pumpkin. I was going to use a Dremel and cut out this design but realized that this particular pumpkin was filled with foam so make sure your pumpkin is a hollow craft pumpkin!

 halloween 3


halloween 4

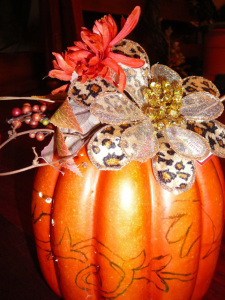
Going from This above to This below!

halloween 5

Don’t be afraid to have some fun with your design. This look was accomplished with a using a stencil and a dremel tool and acrylic paint.

Tip: If you use Acrylic paint I sugest that you seal your pumpking with a clear acrylilc spray to protect the paint from chipping.

They also have glow in the dark paint too!  How Cool!

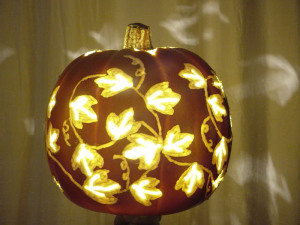
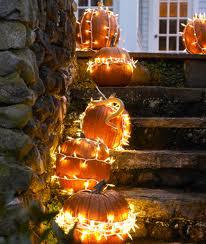
A second idea is to get creative with some Christmas lights. You can wind these perfect pumpkins with lights giving off different designs without too much effort. You will need craft glue-preferably a hot glue gun. Just string them together as you would Christmas lights.


halloween 6 

Thank you father that we can enjoy fun things like this in our lives.

Happy Halloween everyone!

Mischele Makhlouf

Hanging up and Hanging in

Standard


This week’s project will be “How to hang Cupboards”!

I may have mentioned that I am President of the “Trustees” at our church. This is my 5th year running our group and by far this year I have the best team. Really enjoying the fellowship, work and accomplishments we have made this year.

We have a couple who have become our Youth Directors and needed some cabinetry hung in their new kitchen so what better than to take a few pictures and teach on the subject.


Does it every amaze you how much your cupboard can hold. Imagine the weight they hold and yet they seem to stay strong and never cave to the demands that we put on them. It is the same way with our “God”. He is even better than a cupboard because of that personal relationship you can have. If you work on hanging in there with him he will never fail you.


Things you will need for this project:

Drill and Impact drill is even better for driving screws

No. 8-3” wood screws or 3” drywall screws will do.

Cupboards of course

Level and stud finder

Some scrap 1” x 6” or 2 x 4’s are otional -They will be used as a jig to make the job easier.


First I want to introduce you to Dave (left) and Jeff (right). Dave actually teaches word working and Jeff is the Father of Erin who is our Youth Director.  They really made this job simple.

cupboard 1

We were actually using cupboards that were donated to the church so we did a little measuring to see what would fit where and amazingly we didn’t have much trouble deciding where we would hang them. As if they were made for the kitchen. “God is Good Right”!

 cupboard 2

We are actually working in a corner so we took the time to find some studs to anchor the screws in and marked them on the wall below the cabinet for reference.

Dave had this neat little jig for setting the cupboards on so you don’t have to hold them up while you are trying to secure the cupboard.

It is basically 2pcs of 1×6 cut to 16” long (or desired height) and “T’d” together. I believe this picture does it justice if not the last picture of the article will help.  The 16” height is the space between the bottom counter and the bottom of the upper counters. Obviously you can make this little jig to size but it really did make it easy to adjust the cupboard on.

My father and I use a different method. We first figure out the height we need our cabinet to be and then use a chalk line w/a little bubble level on it and snap the line. Then we hang a 2×4 on that line and screw it into the wall.


We then proceed to put the cabinets up tipping the back of the cupboard on top of the 2/4 we just secured. That works rather well too; especially if you working on an un-level surface. This method is used in older homes or basements.

 cupboard 3

Once we have the cabinet in place and make sure it is level; we use our Impact drill to put the screws in place.

I never new what an impact drill really did but let me tell you….I have got to get me one of these! Especially if you don’t have a lot of upper body strength or you are trying to drill from an awkward position. This thing needs no muscle. The screws go in smooth as silk.

If you do not have an impact drill; use a drill bit smaller than your screws and pre drill holes. Then go ahead and put your screws in. I usually just pre-drill 2 holes. Put the screws in and then I finish the rest of the cabinet. Not there are 3 (?) inside this particular cabinet so I put screws on both sides of each of them according to where my studs lay.


Here is the finished product. We had windows to work around and all kinds of stuff that were already existing on the walls so I think this came out really well considering the cabinets were not specifically made for the kitchen. (Arrow is pointing out the 1 x 6 jig)

cupboard 4

Well Bona petite my friends.

Have a wonderful weekend!


Mischele Makhlouf

Firepit lll

Standard

mischHowdy Gang,


Well here is the final frontier and we honestly be cooking with fire by the time we are done.

So far we have manage to design, layout our brick edging, set our fire place ring, fill in the area with slag and put in our patio stones.  Looking good wouldn’t you say?!

Nice and level and even my cat has moved into the picture!

firepit 3 1

The next step that I did was take my wet saw and cut the stones to fit around the fire pit ring.  Since this is a minor project you can take a skil saw…meaning just a regular electric hand saw and put a masonary blade on it. Wet down your patio stones quite a bit. Measure and mark the lines you wish to cut and just start filling in the last bit. The best way is to keep water running onto the cement stone. Definitely be very careful not to get your power chord in water. I think I only had to cut 8 to 10 stones.

OLYMPUS DIGITAL CAMERAThey are minor cuts and should be

Fairly easy to manage with a skil saw. Don’t worry about being exact because as you can see you will be filling the seems in with pea gravel or slag. Depending on your choice of look.OLYMPUS DIGITAL CAMERA

Ok now all the stones are in place so it is time for the finishing touches. I used approximately 5 bags of (small) pea gravel to fill the cracks in. I spread it out with a broom. Don’t pile it in one spot it is hard to get it moving just kind of pour it all over an area and then proceed to broom it into the cracks.firepit 3 4

Of Course you need to add in some chairs. I purchased these from a garage sale, the were all torn up. I purchased out door material on sale and refurbished them. It was kind of like wrestling a monkey to the ground. LOL but I would do it again. Someday I will have to teach you all how to sew!

firepit 3 5

A few years later, I decided to plant some hosta’s to soften the edges and put a few little Stone tables near the chairs for comfort and I also with some Tiki torches. We are able to sufficiently back up from the fire if it gets too warm so it has been well designed.


We have enjoyed this for 3 years only a couple of patios stones have moved over that amount of time. I have to say that I am truly happy with the result thus far. Only thing I found I need to do is hit a few spots with weed killer….I think because I used pea gravel instead of slag for looks but otherwise it is pretty maintenance free.

Gotta love Maintenance free!


Happy Fall Days to you all!

Mischele Makhlouf

Fire Pit II

Standard

mischHowdy all,


This is the second article for our fire pit project. At this point in our article we have designed and cleared out the area in which we want to build our fire pit.  We also have put down slag on the outer edges and set our patio stones. Everything is lining up nicely and looking square! That is if you are building a square! LOL


Tools we are using on this job:


Shovel                         Pick axe                       Branch Clippers                      Slag

Pea gravel                    Fire pit ring                 Long straight edge                  Lg. Square

Rake                            Patio stones                 Level                                       Gloves


At this point we need to measure the size of project to find out how much cubic feet of slag we will need. I found it much easier and cheaper to just have it delivered than to pick it up in bags from the store.


Here are some simple measuring tools


Cubic Yard = 27 Cubic Feet; 3 Feet = 1 Yard; 144 Square Inches = 1 Square Foot; 9 Square  1 Cubic yard will cover 162 square feet if spread 2 inches thick.


  1. Length x Width = Square Feet
  2. Square Feet ÷ “X” = Cubic Yards (to find “X,” match depth with number at right –on page below)
  3. To convert Cubic Yards to Tons*: Cubic Yards x 1.4 = Tons
  4. To convert Tons to Cubic Yards*: Tons ÷ 1.4 = Cubic Yards

*

1.4 is a rule of thumb that will work for most sand and gravel products (1 yard = 2,800#). Some products such as soils and mixes may vary due to their different bulk densities (weight per cu. yd).


Example 1: 2,000 Square Ft. bunker at 6″ deep
2,000 ÷ 54 = 37 Cubic Yards Bunker Sand
37 x 1.4 = 52 Tons
Example 2: To cover cart path 1,200′ x 4′ x 3″ deep
1,200 x 4 = 4,800 square feet
4,800 ÷ 108 = 44.5 cubic yards gravel
44.5 x 1.4 = 63 tons


Inches 
deep

  “X”

1″

  324

2″

  162

3″

  108

4″

  81

5″

  65

6″

  54

7″

  47

8″

  40

9″

  36

10″

  33

11″

  30

12″

  27


I hope this chart is useful. You can also find a calculator on line and just plug in the numbers and it does the work for you.


Next we need to put our fire ring in place. I basically centered it by measuring from the ring to the inside of the patio stones and kept adjusting it till I had it completely center. Change up your design if you like. I set my fire pit ring about 2-3 inches above where my patio stone would lay. You can make it flush but I wanted a little height to mine. Next I laid a two by four across it because it is so wide and checked it in several directions for levelness. Once this is in place go to work and start filling in the remaining area with slag.

firepit 2 1


Definition of Slag: It is a partially vitreous by-product of the process of smelting ore, which separates the desired metal fraction from the unwanted fraction. Kind of cool they found a use for this by-product!


There are two different grades one is what they call “foundation” slag which has more stones in it.  The other is a “finishing” slag which is usually used in between the patio stones. It just sweeps right in place and acts kind of like cement keeping the patio stones from moving once in place. Slag also is a great weed preventer and does a better job than sand will.


It is important to use slag as a foundation f you have to worry about frost in your area. Slag may not be necessary in warmer climate areas.


I used a rake and started spreading it around leaving about an inch below the surface of the retaining wall blocks. This way when I start laying the patio stones they will be nice flush with the out side border. Definitely use your legs for lifting….I know you have heard it a thousand times.

 firepit 2 2

As you can see I started going across the shorter edge first going from corner to corner and then I went up the left side. This gives me reference points for putting in the next stones. I left about ¼” in between the patio stones. It is very much like laying tile. You need to lay the stone then check for levelness and move on to the next stone. I found my self going back and making adjustments as I went and tapping them into place with my palm to make sure they don’t move after I have finished the project.


Don’t know why but I find it really relaxing and I just take my time enjoying the work and my surroundings. I hope you find it therapeutic as well.


Stay tuned for the next article. We will put the final touches on this project. I couldn’t wait to get this finished for fall festivities.


Have a blessed week!

Mischele Makhlouf


Build your own firepit

Standard

Howdy all,


I am going to split this subject into a couple of articles. I am calling it “HOW TO BUILD A TASH MAHAL OF A FIRE PIT”  That’s only because my friend said that it was the nicest fire pit she had ever seen. LOL


I always like to give a picture of the final product at the end but you may or may not be interested in this project so I will show the end result up front.

firepit1

Voila!

I LOVE this picture… it was early in the morning and the sun was just coming up and was shining down as if God was blessing it for the first time. It is so peaceful just to sit out here and have coffee in the morning even if you don’t have a fire burning.

Tools you will need:

Shovel                         Pick axe                       Branch Clippers                      Slag                

Pea gravel                    Fire pit ring                 Long straight edge                  Lg. Square

Rake                            Patio stones                 Level


In designing you fire pit you should take into consideration the area and surrounding area. Our trees are old; probably 60 to 80 years old but they are all Hardwood trees so they are really tall, and wouldn’t be in danger. I wanted the fire pit itself to be sunk down in the ground so we didn’t have to worry too much about flying ambers. With that in mind I also wanted to be able to step up on to the patio due to this area being low and it sometimes has a lot of standing water in the spring and fall.


Knowing that it would be a focal point in our back yard I figured I wanted to make it into a rectangular shape. It just seemed to fit the area best. Definitely take into consideration the size of your fire pit ring also. Mine is a 4ft diameter ring there is also a 3ft ring available if you don’t want it to be too large. I also had thought about lining the pit with fire brick but that was going to cost a ton and I found out that they will still crack under extreme heat so I chose to go with ring instead. If you are considering using fire brick definitely do some research. So the fire pit ring turned out to be more economical and so far mine does not seem to be rusting and it has been 3 years since I put this in.


Also take into consideration when designing; that the fire can get pretty warm so you want to have enough room to back up your chairs from the fire if you need too.  Girls usually love it warmer and the guys don’t so this rectangular shape makes the seating arrangements very accommodating for both.


A preliminary step is to lay out your patio stones. I marked the area with 4 steaks and some colorful string. Then I went to work and started out clearing the area of brush; dug and pick axed down about 8 inches below ground level. I ran into some tree roots so I clipped those and cleared them out of the way. I raked the area as level to the eye. It does not have to be exact.


The purpose for the slag is to take the frost so that our patio stones will not heave up and down. It just makes for a big old maintenance project you don’t want to have to up keep.

Slag Help Prevents Weeds and Keeps your Patio Stones from Heaving!


Once your design is complete you will need to figure out how much slag you need. I ended up bringing in a load of slag for my project but you can buy it by the bag if necessary. You also need to figure out the dimensions of your stone and how many you will need.

If you need help with amount of materials the Commercial desk or customer care desk can help you determine this information.


In this picture you can see how I cleared the brush out. I edged the area with slag and lined up my Patio stones. I also took into account that the distance from inside corner to inside corner would accommodate my patio stones equally so I would not need to cut them. If it helps….lay out those first just to get an idea. Don’t be afraid to play around at this point. It will make the rest of the job go much easier.

firepit2

In this case I used retaining wall stones for the border. There are so many different firepit3colors and different styles of patio stones to choose from so have fun and shop around…not everyone carries the same styles.


Tip: I used the “Price Match” approach. They were running a special at one particular store and since I had to gradually get my supplies I had them price match a  competitor’s price that was closer to home. A good tip to keep in mind.


For a straight edge you can use a 2×4; I used a pc of metal that was left over from building my house. I started in one corner; using my Square to line up the first 3-4 stones. Then I line up my straight edge. As you are placing your stones make sure you are using your level on each one as you go. This will ensure that the entire patio will be level by the time you are done.

It is extremely important to level and square your edging at this stage to avoid further problems down the road.


Take your time this is the difficult part and also I kind of patted them down on to the slag to make sure they weren’t going to move too much in the future.


By the time you do this on 3 corners your fourth corner should line up perfectly. You may have to do a little tweaking to get it they way you need it.

I hate to admit it but I didn’t have my third corner in line and had to back track a little to get it to line up correctly. Stand back and double check how it looks to your eye. If your happy with it get ready for the next step.


Stay tuned for the next article. That’s where it will get really interesting!


Have a great week!

Mischele Makhlouf